ZATCA onboarding for Desko POS
Connect your Saudi store to ZATCA’s Fatoora platform for Phase 2 e-invoicing. Complete the business profile, register the invoicing solution, finish compliance checks, and confirm that the production certificate is issued before using the integration.
This guide is for Desko POS. For the separate invoicing product, see Desko Invoice ZATCA settings.
Before you start
| Requirement | What to check |
|---|---|
| VAT registration certificate | Registered legal name and 15-digit VAT registration number. The shorter TIN is a different field. |
| Commercial registration or applicable licence | Registration number and its correct type. A unified 700 number is different from a CR number. |
| Saudi National Address | Street, 4-digit building number, district, city and 5-digit postal code for this branch. |
| Fatoora access | The taxpayer or authorised representative can sign in and generate an onboarding OTP. |
| Desko POS access | Active ZATCA add-on, an up-to-date app, and a member signed in with a PIN and relevant ZATCA permissions. |
Use the registered legal name on invoices, even when the store trades under another name. Cross-check the VAT certificate, CR/licence and National Address. Do not guess the postal code from a neighbourhood or copy the sample values below.
Production uses the taxpayer’s Fatoora account. Simulation is a separate test environment arranged with your administrator or Desko support. Do not enter simulation OTPs into a production store.
1. Open ZATCA setup
- Open Menu > Billing & Subscription > Active Addons.
- Find the active ZATCA add-on and select Onboard.
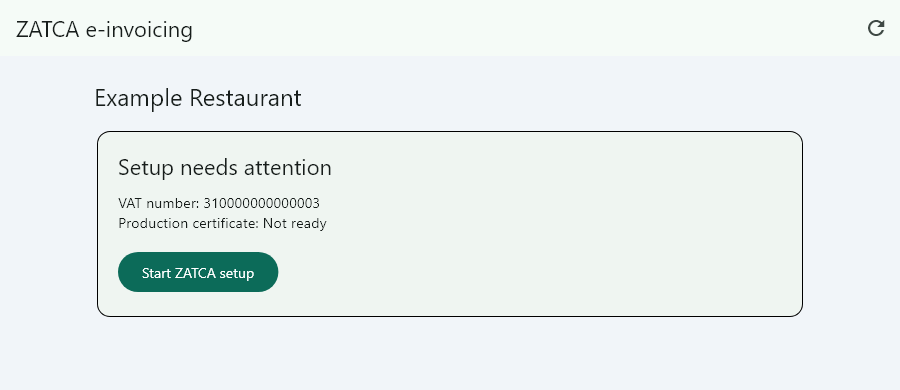
- On ZATCA e-invoicing, review the store and VAT number, then select Start ZATCA setup for first-time onboarding.
If the add-on or button is missing, check the subscription and member permissions with your administrator. Configuration and invoice submission can require different permissions.
2. Generate a fresh Fatoora OTP
Open the official Fatoora portal and sign in as the correct taxpayer. Choose Onboard New Solution Unit/Device, request the number of OTPs needed for the units you are onboarding, and generate the codes. Enter an unused code in Desko within one hour of generation.
The onboarding code is different from a login verification code. Generate it after gathering the business details. Never publish an OTP in a screenshot or share your portal password in a support ticket.
For the portal screens and login process, use ZATCA’s illustrated Fatoora Portal User Manual.
3. Complete the onboarding form
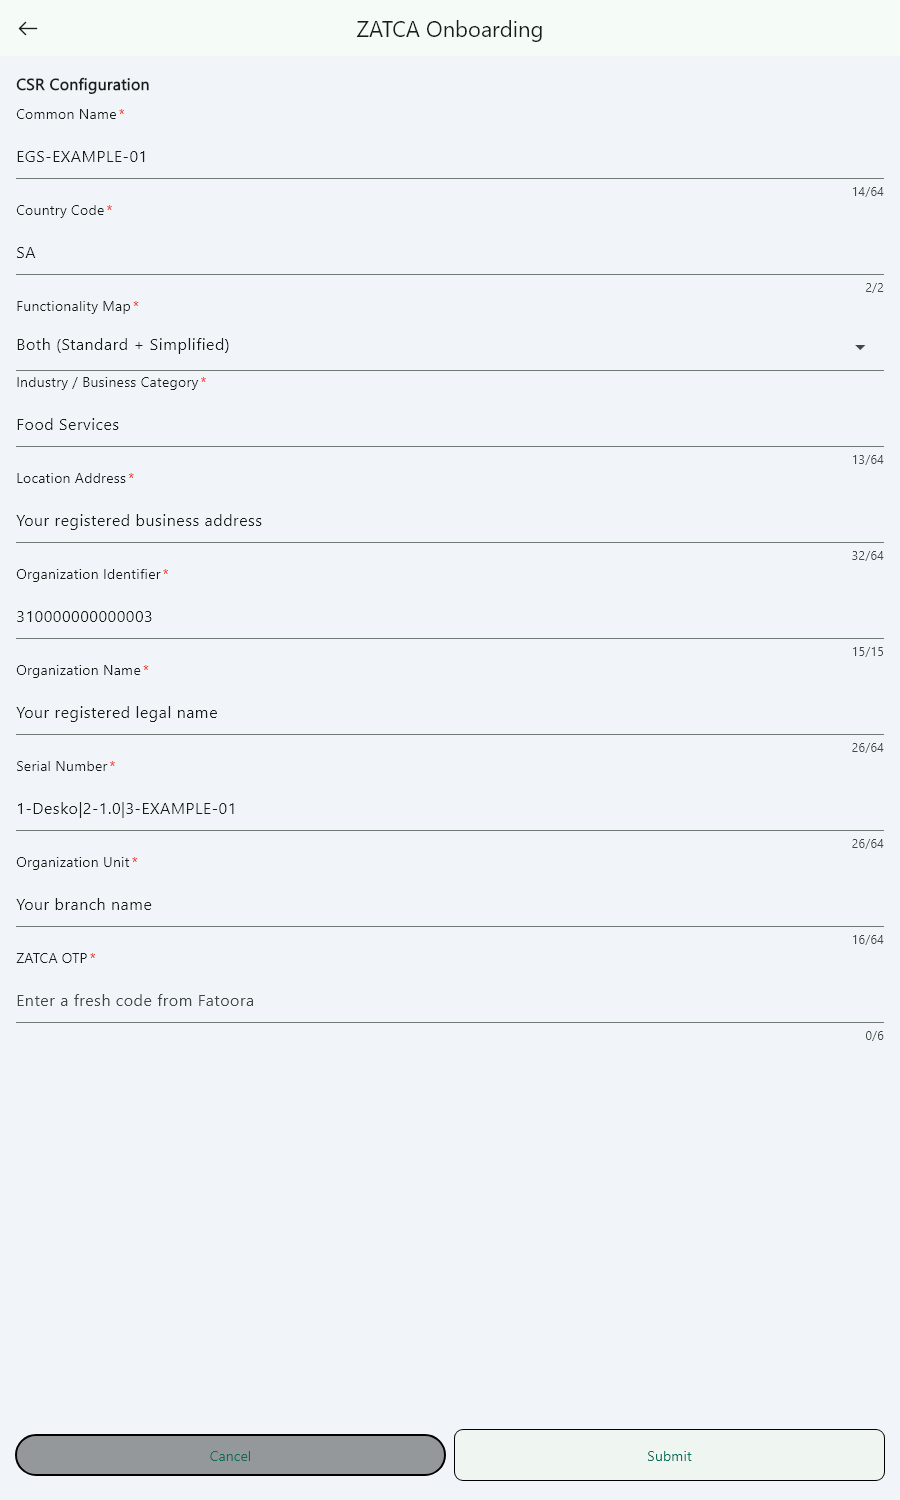
On ZATCA Onboarding, fill the CSR configuration and OTP. CSR means certificate signing request: it identifies the business and invoicing unit to ZATCA.
| Form field | Enter |
|---|---|
| Common Name | The invoicing unit’s name or identifier, provided by your administrator. |
| Country Code | SA. |
| Functionality Map | Simplified, Standard, or Both, matching the invoice flows the unit will issue. Confirm the selection with your administrator. |
| Industry / Business Category | The actual business activity, for example Food Services. |
| Location Address | The registered location of this invoicing unit. |
| Organization Identifier | The 15-digit VAT registration number. |
| Organization Name | The registered business name. |
| Serial Number | The unique invoicing unit identifier provided by your administrator. Do not reuse another store’s identifier. |
| Organization Unit | The branch or organisation unit name. |
| ZATCA OTP | An unused onboarding code for the correct taxpayer and environment. |
Select Submit, review the confirmation dialog, and select Confirm. Allow the request to finish and refresh the setup screen if needed.
4. Save the registered address and complete compliance
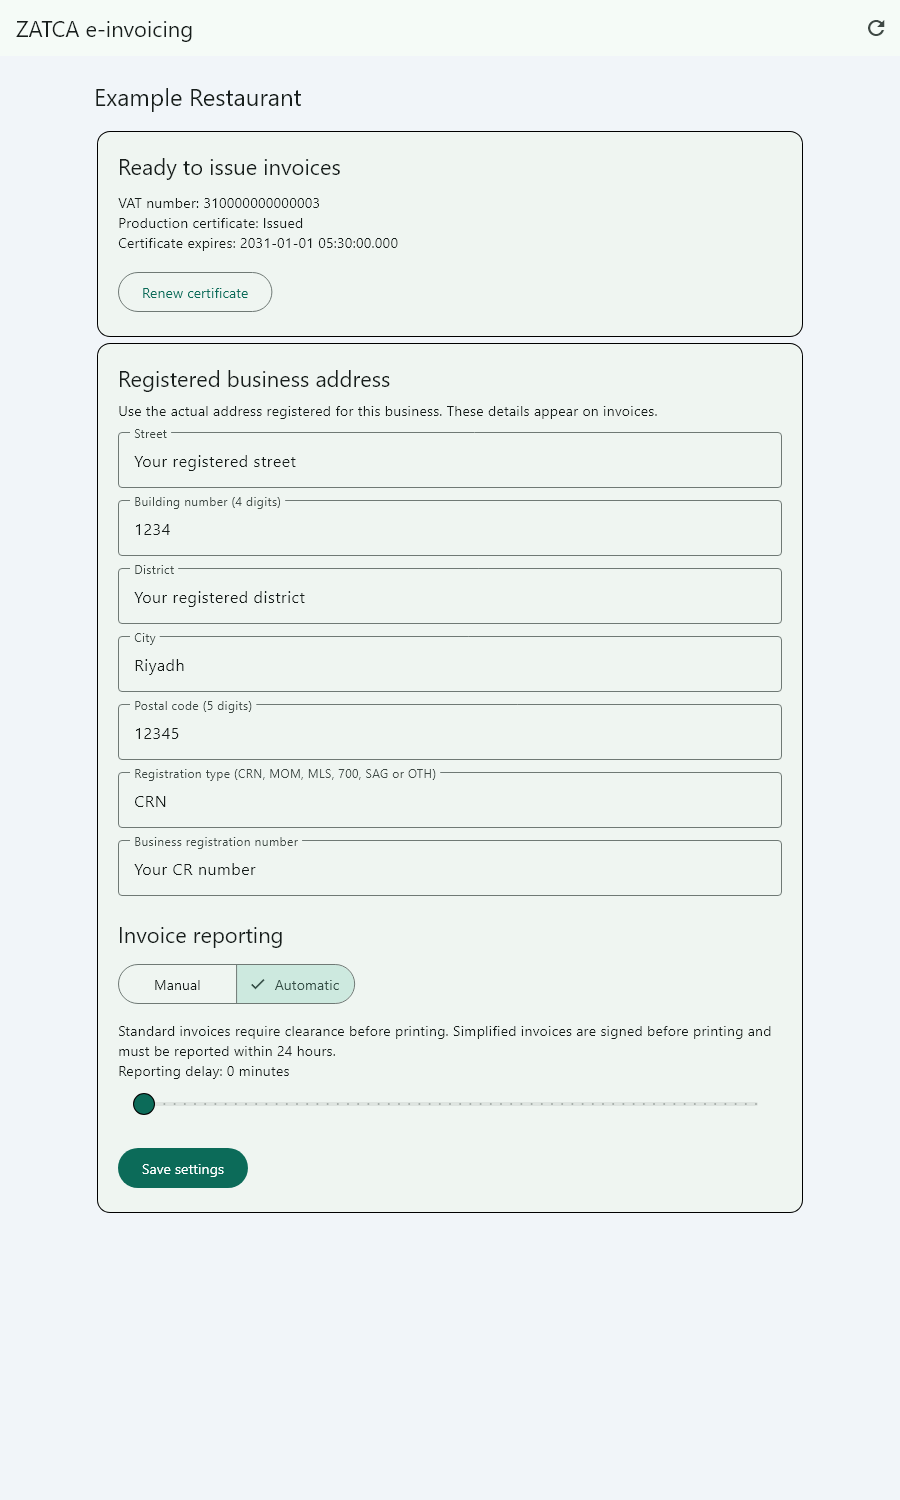
After the onboarding request is saved, Registered business address becomes available. Fill every field using the branch’s verified documents:
- Street, building number, district, city and postal code.
- Registration type and the matching registration number. CRN means commercial registration; 700 means unified number. Other supported types are MOM, MLS, SAG and OTH. Use the applicable identifier and type.
Select Save settings. If the production certificate is not ready, select Retry compliance and certificate steps. This resumes setup using the saved compliance credentials; a new OTP is normally unnecessary for this stage.
Desko runs the samples required by the selected functionality. Both includes standard and simplified invoices, credit notes and debit notes: six samples. The final step obtains and saves the production certificate.
A saved request or issued compliance certificate does not mean production setup is complete. Confirm Ready to issue invoices and Production certificate: Issued. Resolve any address, certificate, renewal or invoice-history message shown.
5. Choose how invoices are reported
In Invoice reporting, choose a mode and select Save settings:
| Mode | What to do |
|---|---|
| Manual | Use the bill’s ZATCA action to report simplified invoices and monitor outstanding submissions. Signing or printing alone does not confirm reporting. |
| Automatic | Set a delay from 0 to 60 minutes. Zero makes the invoice eligible immediately; processing still depends on connectivity and the submission service. Monitor failed or pending invoices. |
Standard invoices require clearance before printing. Simplified invoices are signed before printing and must be reported within 24 hours, regardless of reporting mode.
6. Submit and verify the first real invoice
- Complete a genuine sale with correct items, VAT and seller details. Use simulation for made-up transactions.
- Open Menu > Sales > Bills and open the bill.
- In ZATCA actions, select Submit to ZATCA if manual submission is required.
- Wait for the response and refresh the bill status.
- Confirm acceptance. REPORTED confirms simplified reporting; CLEARED confirms standard clearance. Review warnings as well as errors.
A QR code, a signed status or a successful print does not prove authority acceptance. Keep the accepted invoice, original signed document and QR intact. Use the appropriate refund or credit-note process to correct an issued invoice rather than editing it.
Troubleshooting
| What you see | Next step |
|---|---|
| Invalid-OTP | Check taxpayer, environment, code type, unused status and one-hour validity. Generate a fresh onboarding code if needed. |
| Missing address or registration details | Complete Registered business address, save, and retry remaining setup steps. |
| Compliance certificate issued, production certificate not ready | Resolve the displayed error and use Retry compliance and certificate steps. Do not start first-time onboarding again. |
| Network error or timeout | Refresh status before repeating. A request may have completed remotely; support may need to investigate an uncertain certificate result. |
| Existing production certificate | Use renewal. First-time onboarding must not overwrite it. |
| Accepted with warnings | Investigate the warning. A QR timestamp warning requires support to check the signing service; changing the postal code does not fix it. |
| Rejected or pending invoice | Review the saved response. Retry the same saved invoice through Desko rather than creating a duplicate bill. |
| Invoice history must be reconciled | Contact your administrator. Do not reset counters or hashes to bypass the hold. |
Certificate renewal
Use Renew certificate and enter a fresh renewal OTP from Fatoora. Finish outstanding invoices first. Desko checks readiness and holds new issuance during renewal; Resume renewal continues a resumable attempt. Contact support for an uncertain outcome, lost key, replacement device or changed business identity.
Renewal retains invoice history and counters. Do not use first-time setup to replace a working certificate.
Official references and support
- Fatoora portal
- Fatoora Portal User Manual, with portal screenshots
- ZATCA e-invoicing technical guidelines
- Desko POS support
For support, include the store name, invoice number, time and visible error. Share redacted screenshots; exclude OTPs, portal passwords and certificate secrets.
Last reviewed: 11 October 2026. Screenshots are rendered from the current POS views using documentation-only sample data.